Widget Settings:
Topbar Icons
Access your blog Layout > and click on the Edit Icon > in the Topbar Icons gadget.
Supported Icons: blogger, apple, amazon, microsoft, facebook, facebook-f, twitter, rss, youtube, skype, stumbleupon, tumblr, vk, stack-overflow, github, linkedin, dribbble, soundcloud, behance, digg, instagram, pinterest, pinterest-p, twitch, steam, delicious, codepen, flipboard, reddit, whatsapp, telegram, messenger, snapchat, email, discord, quora, share, external-link
Widget Settings:
Access your blog Layout > and click on the Edit Icon > in the Mobile Logo Section gadgets.
Access your blog Layout > and click on the Edit Icon > in the Header Menu gadget.
Normal Link and DropDown Options:
Homepage Link Example: Add the text and in the site url field add {homepage}
Normal Link Example: Features
SubLink Level 1 Example: _Level 1 “Before the Title add 1 underscore“
SubLink Level 2 Example: __Level 2 “Before the Title add 2 underscore“
Main Menu Settings:

Home Link Settings:

Mega Menu Options:
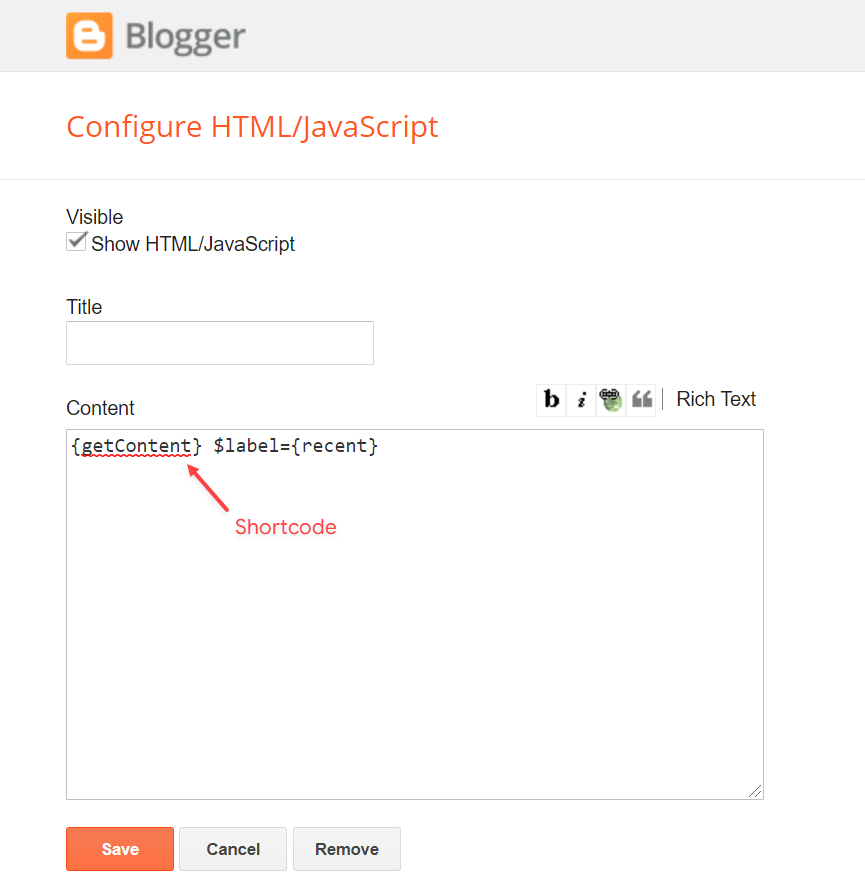
Shortcode: {getContent} $label={Your Label}
Shortcode Label: label or recent
What are Label?

Shortcode Example: {getContent} $label={Laptops}
Mega Menu Settings:

Featured Posts
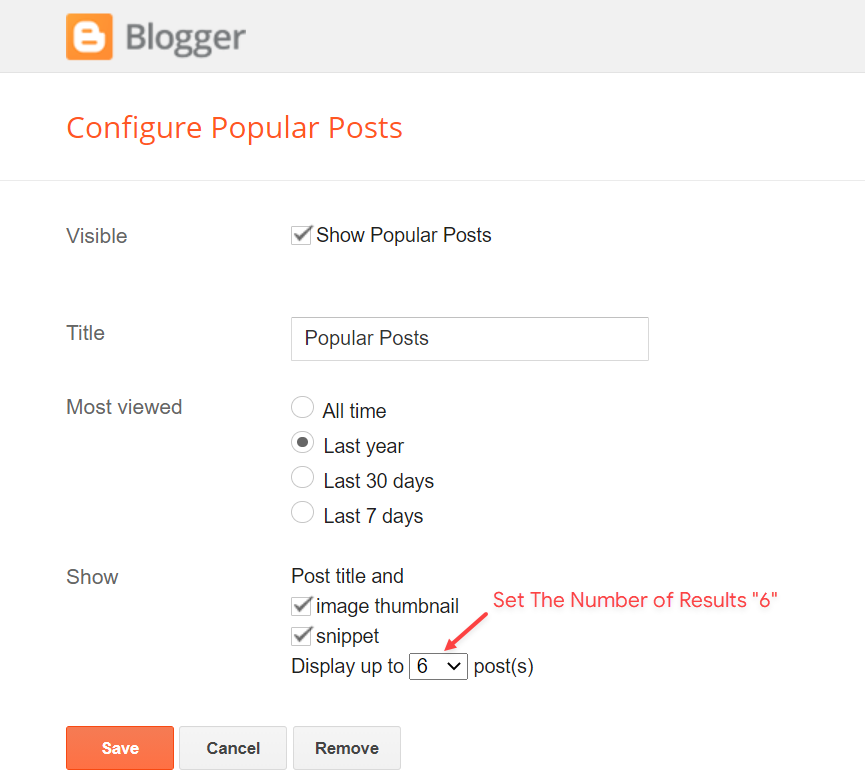
Access your blog Layout > and click on the Add a Gadget > HTML/JavaScript or Popular Posts > in the Featured Posts section.
Shortcode: {getContent} $label={Your Label}
Shortcode Label: label or recent
Shortcode Example: {getContent} $label={Laptops}
By HTML/Javascript:
By Popular Posts:
Header ADS
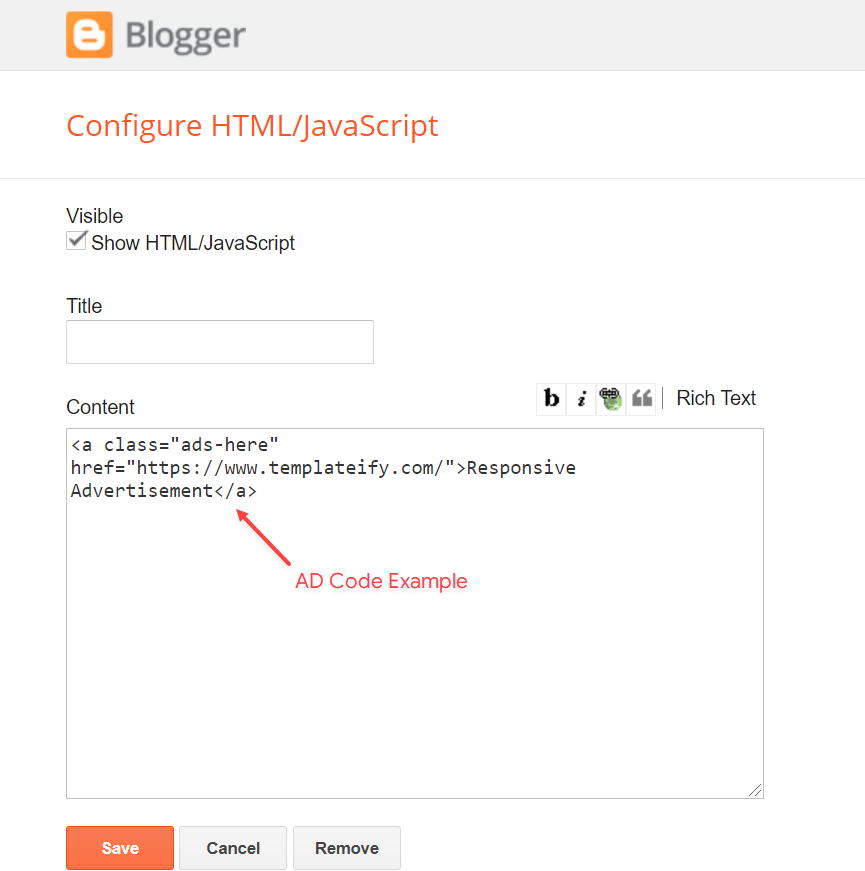
Access your blog Layout > and click on the Add a Gadget > HTML/JavaScript, Image or AdSense > in the section Header ADS.
HTML/JavaScript Example:
Content Section 1 / Content Section 2
Access your blog Layout > and click on the Add a Gadget > HTML/JavaScript > in the sections Content Section 1 or Content Section 2.
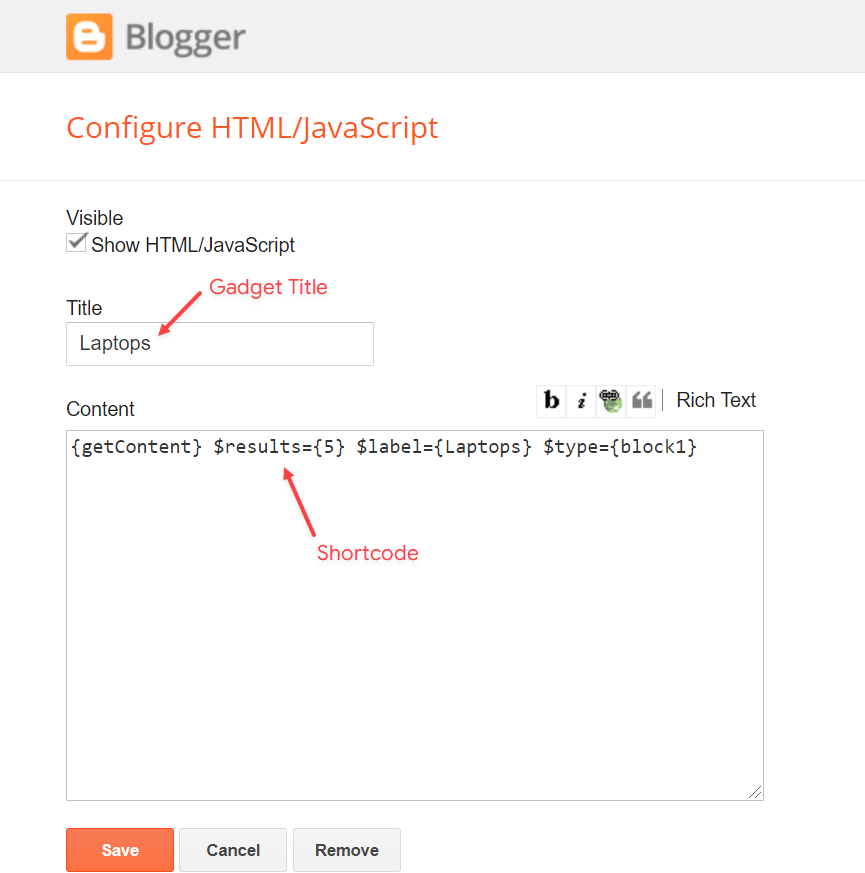
Shortcode: {getContent} $results={Number of Results} $label={Your Label} $type={Custom Type}
Shortcode Results: You must add the desired number of results.
Shortcode Label: label or recent
Shortcode Types: block1, block2, grid1, grid2, colLeft, colRight, video
Shortcode Example: {getContent} $results={5} $label={Laptops} $type={block1}
By HTML/Javascript:
Main ADS 1 / Main ADS 2
Access your blog Layout > and click on the Add a Gadget > HTML/JavaScript, Image or AdSense > in the sections Main ADS 1 or Main ADS 2.
HTML/JavaScript Example:

Main Posts
Access your blog Layout > and click on the Edit Icon > in the Main Posts/Blog Posts gadget.
Widget Settings:
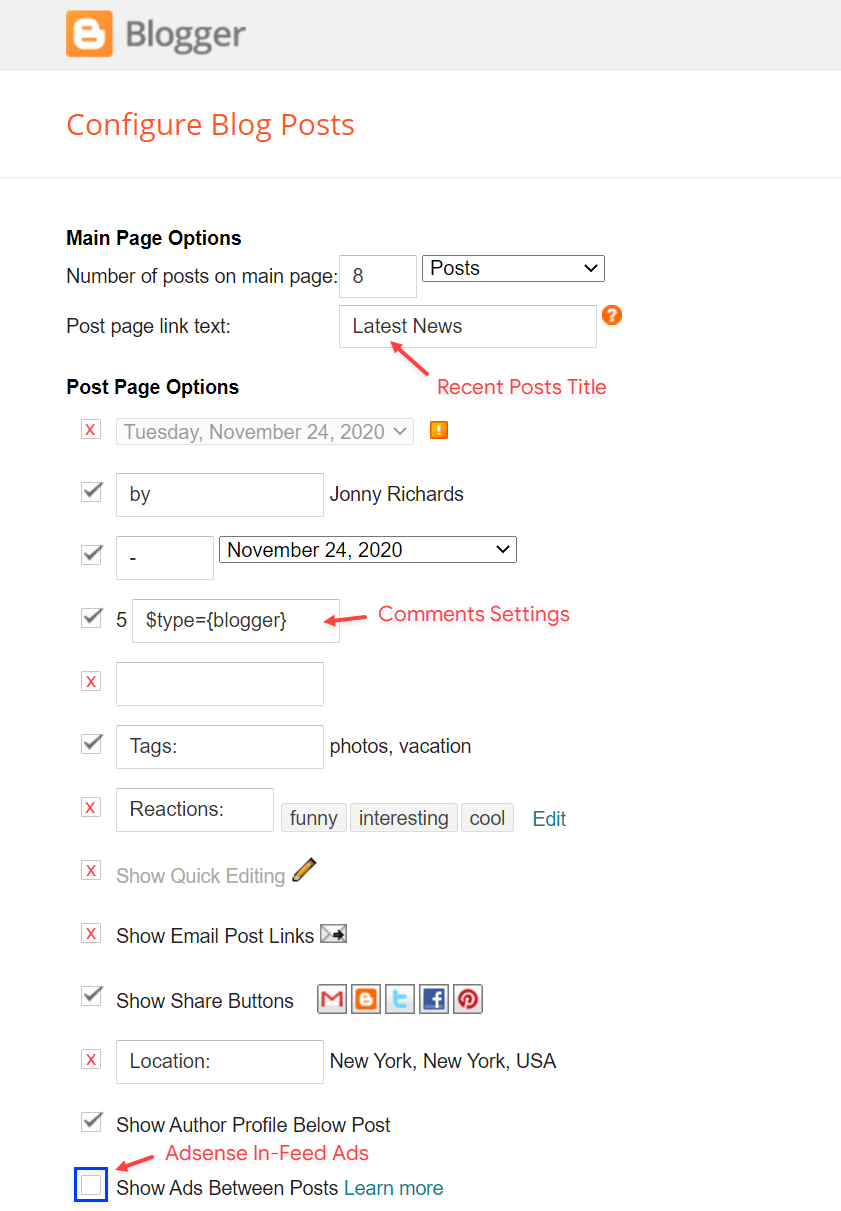
Comments Settings:
The comment settings are intuitive like never seen before. The new shortcodes should be added in > Layout > Blog Posts > Comments Field.
Blogger Shortcode: $type={blogger}
Disqus Shortcode: $type={disqus} $shortname={templateify-comments}
Custom Disqus Shortcode: $type={disqus} $shortname={Your Shortname}
Facebook Shortcode: $type={facebook}
For facebook comments to work correctly, you need to configure the facebook SDK.
Table of Contents
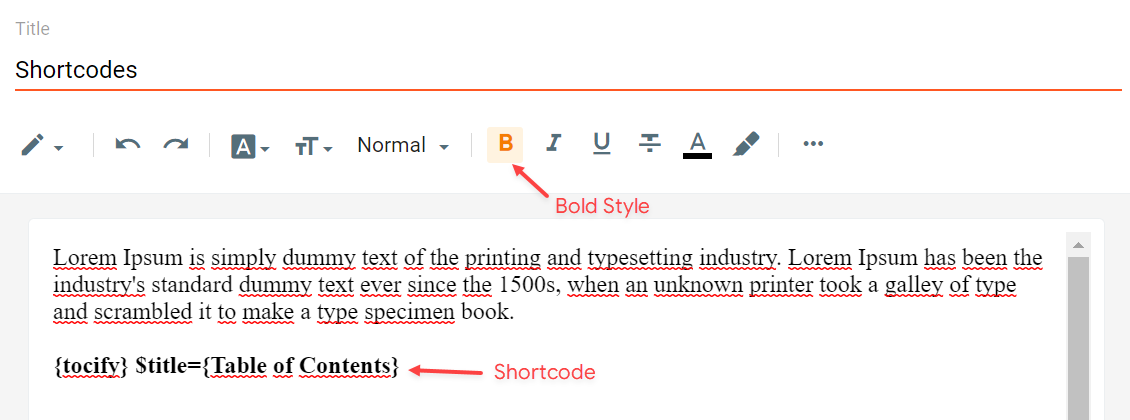
This function is available for posts and pages and can be added easily via shortcode.
Shortcode: {tocify} $title={Table of Contents}
NOTE: After adding a Shortcode apply the Bold style.
Example:
In-Article ADS on “Post Page”
Access your blog Layout > and click on the Add a Gadget > HTML/JavaScript, Image or AdSense > in the sections Post ADS 1 ( before content ) and Post ADS 2 ( after content ).
HTML/JavaScript Example:

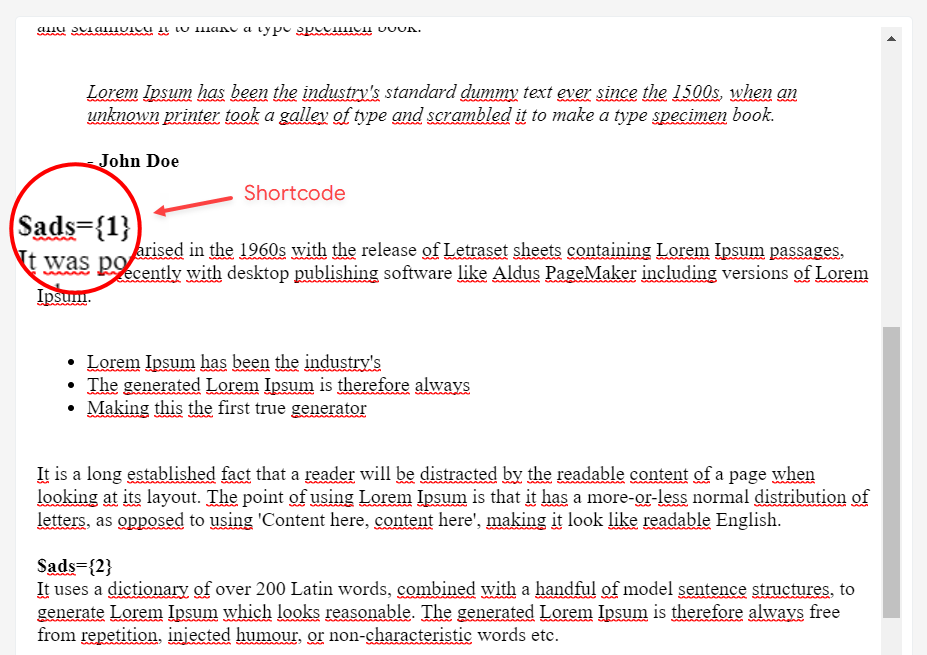
Move Post ADS 1 and Post ADS 2 to inside the post content:
Sortcode ADS 1: $ads={1}
Sortcode ADS 2: $ads={2}
NOTE: After adding a Shortcode apply the Bold style. Example: $ads={2}
Example:
Author Box
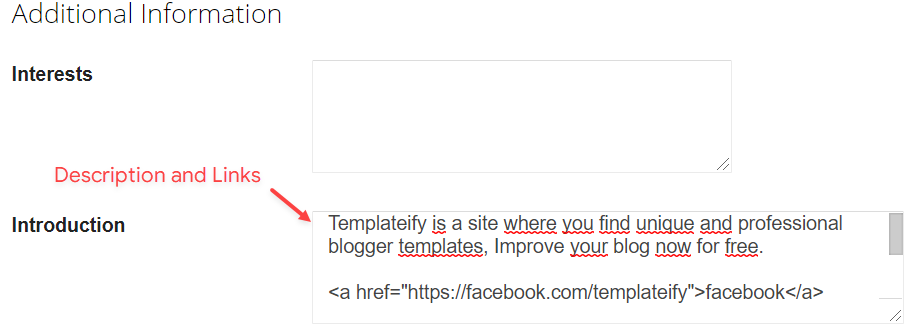
The widget receives the blogger profile informations automatically, As long as your profile is marked as public. The icons are displayed if there are links in the introduction.
Supported Icons: blogger, apple, amazon, microsoft, facebook, facebook-f, twitter, rss, youtube, skype, stumbleupon, tumblr, vk, stack-overflow, github, linkedin, dribbble, soundcloud, behance, digg, instagram, pinterest, pinterest-p, twitch, steam, delicious, codepen, flipboard, reddit, whatsapp, telegram, messenger, snapchat, email, discord, quora, share, external-link
Blogger Settings: Go to https://www.blogger.com/edit-profile.g
Find for Additional Information > Introduction > and add your description with HTML links.
HTML Link: <a href=”https://www.sorabloggingtips.com/2024/01/Your Link Here“>Icon Name</a>
HTML Link Example: <a href=”https://facebook.com/templateify”>facebook</a>
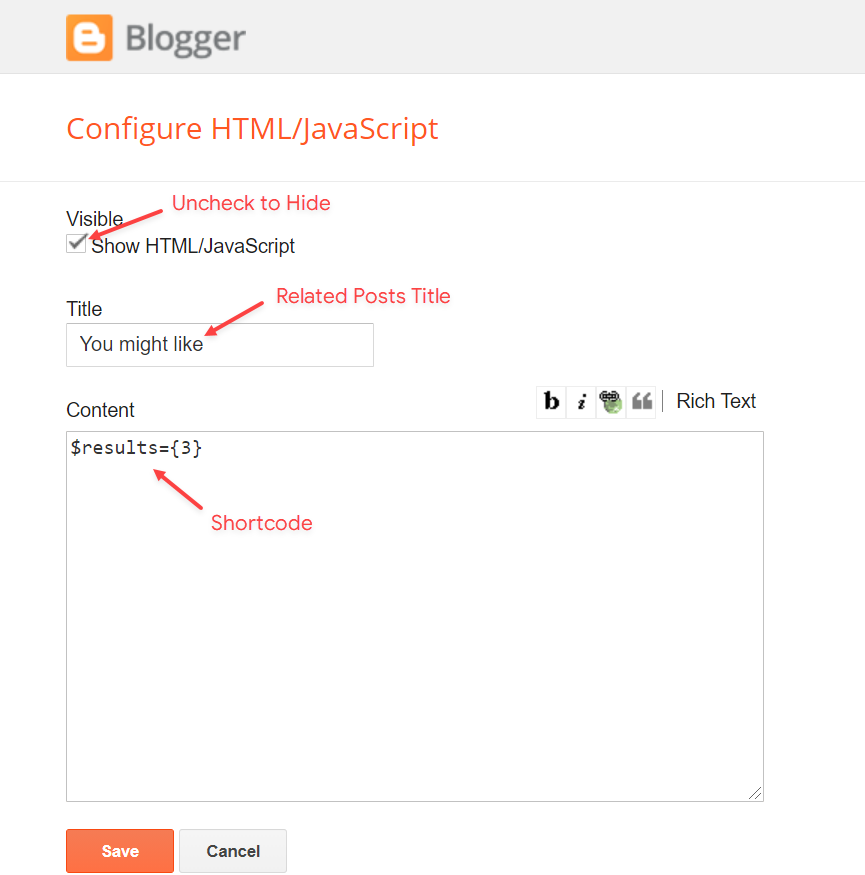
Advanced Related Posts
Access your blog Layout > and click on the Edit Icon > in the Related Posts gadget.
Shortcode: $results={Number of Results}
Shortcode Example: $results={3}
Widget Settings:
Post ADS 3
Access your blog Layout > and click on the Add a Gadget > HTML/JavaScript, Image or AdSense > in the section Post ADS 3.
HTML/JavaScript Example:

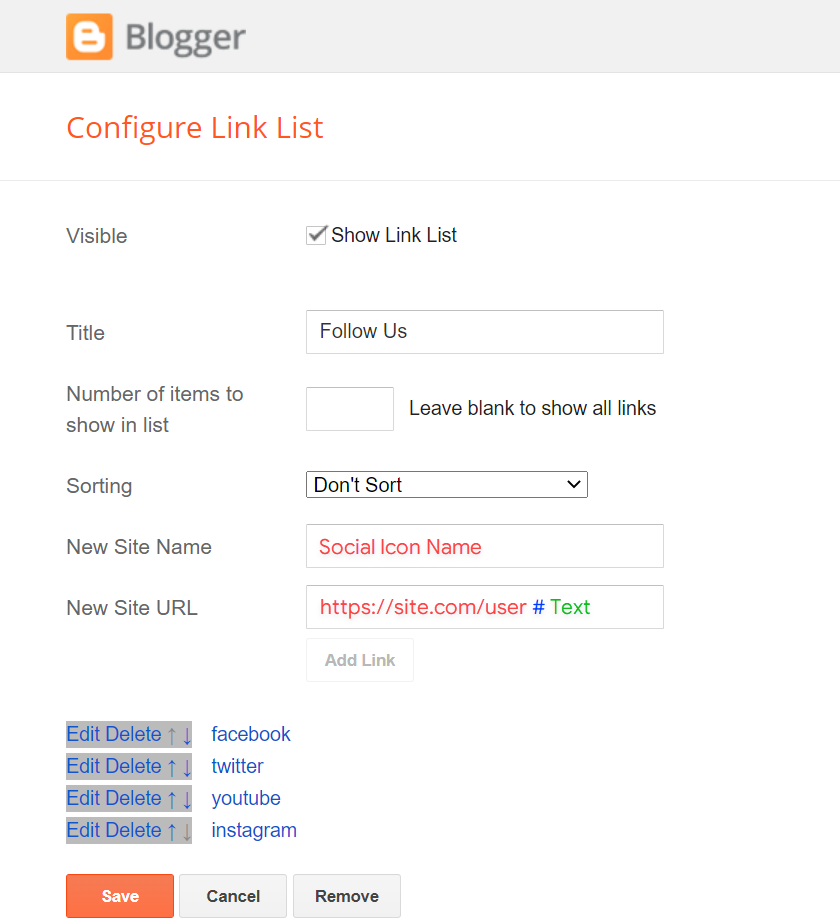
Social Buttons on Sidebar
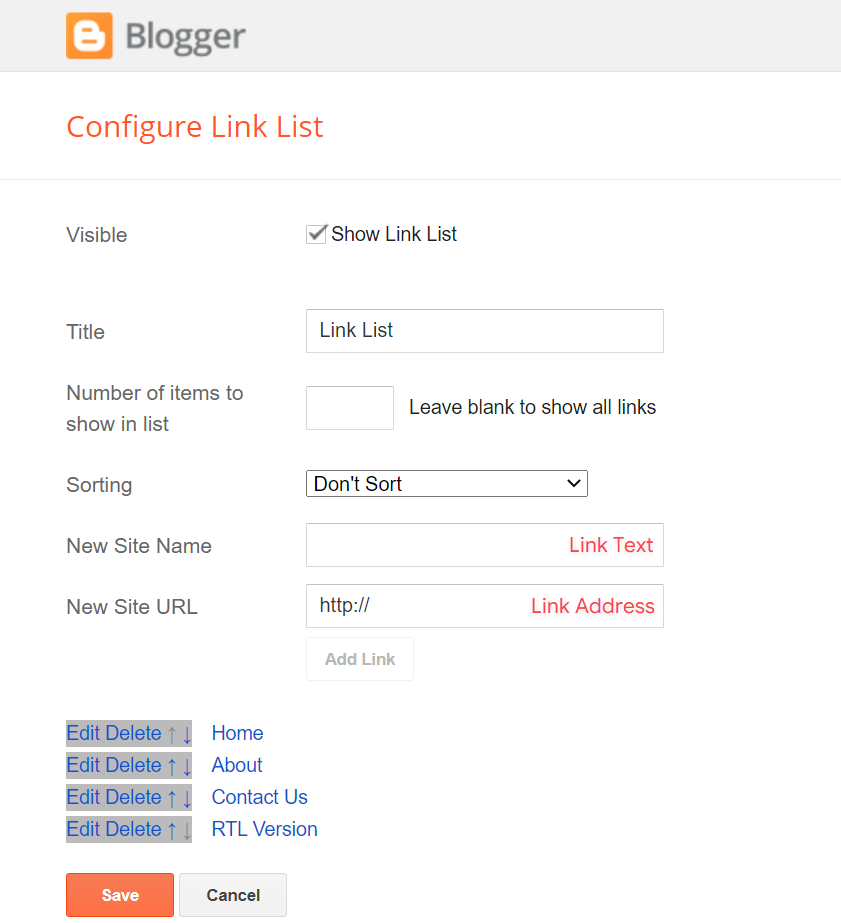
Access your blog Layout > and click on the Add a Gadget > Link List > in the Sidebar section.
Supported Icons: blogger, apple, amazon, microsoft, facebook, facebook-f, twitter, rss, youtube, skype, stumbleupon, tumblr, vk, stack-overflow, github, linkedin, dribbble, soundcloud, behance, digg, instagram, pinterest, pinterest-p, twitch, steam, delicious, codepen, flipboard, reddit, whatsapp, telegram, messenger, snapchat, email, discord, quora, share, external-link
Widget Settings:
Post Widgets on Sidebar
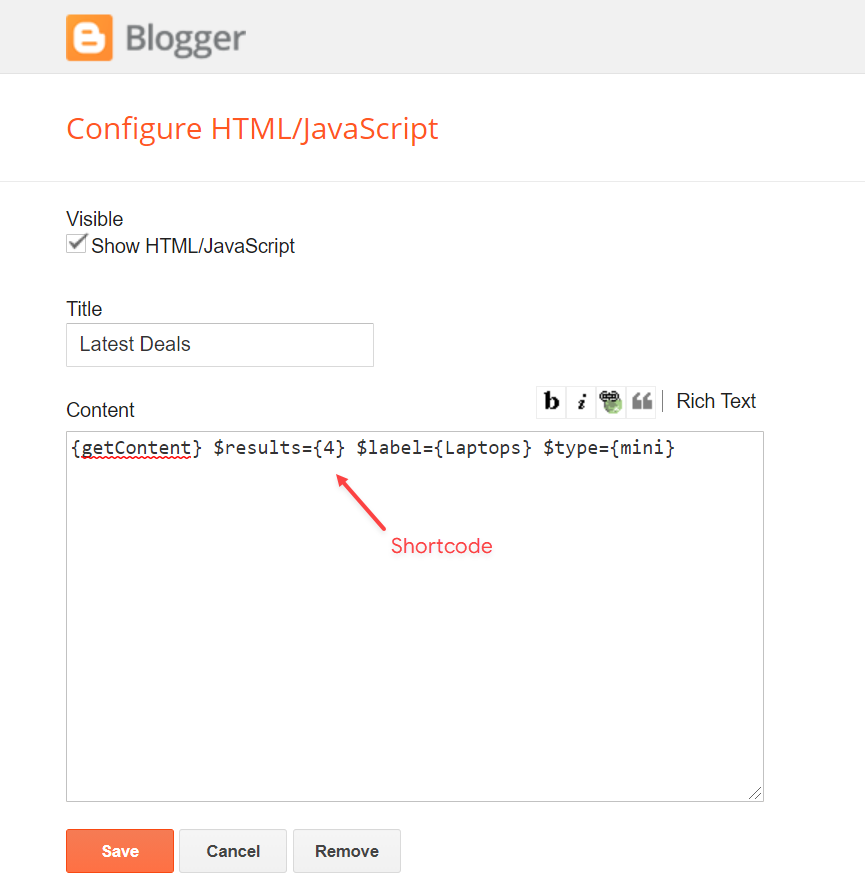
Access your blog Layout > and click on the Add a Gadget > HTML/JavaScript > in the Sidebar section.
Shortcode: {getContent} $results={Number of Results} $label={Your Label} $type={Custom Type}
Shortcode Results: You must add the desired number of results.
Shortcode Label: label or recent
Shortcode Types: default, mini, comments
Shortcode Example: {getContent} $results={4} $label={Laptops} $type={mini}
NOTE: The $label={} attribute is not required for the comments type.
Widget Settings:
Footer ADS
Access your blog Layout > and click on the Add a Gadget > HTML/JavaScript, Image or AdSense > in the section Footer ADS.
HTML/JavaScript Example:

About Section
Access your blog Layout > and click on the Edit Icon > in the About Section gadgets.
1.1 – About Us
1.2 – Follow Us
Supported Icons: blogger, apple, amazon, microsoft, facebook, facebook-f, twitter, rss, youtube, skype, stumbleupon, tumblr, vk, stack-overflow, github, linkedin, dribbble, soundcloud, behance, digg, instagram, pinterest, pinterest-p, twitch, steam, delicious, codepen, flipboard, reddit, whatsapp, telegram, messenger, snapchat, email, discord, quora, share, external-link
Widget Settings:
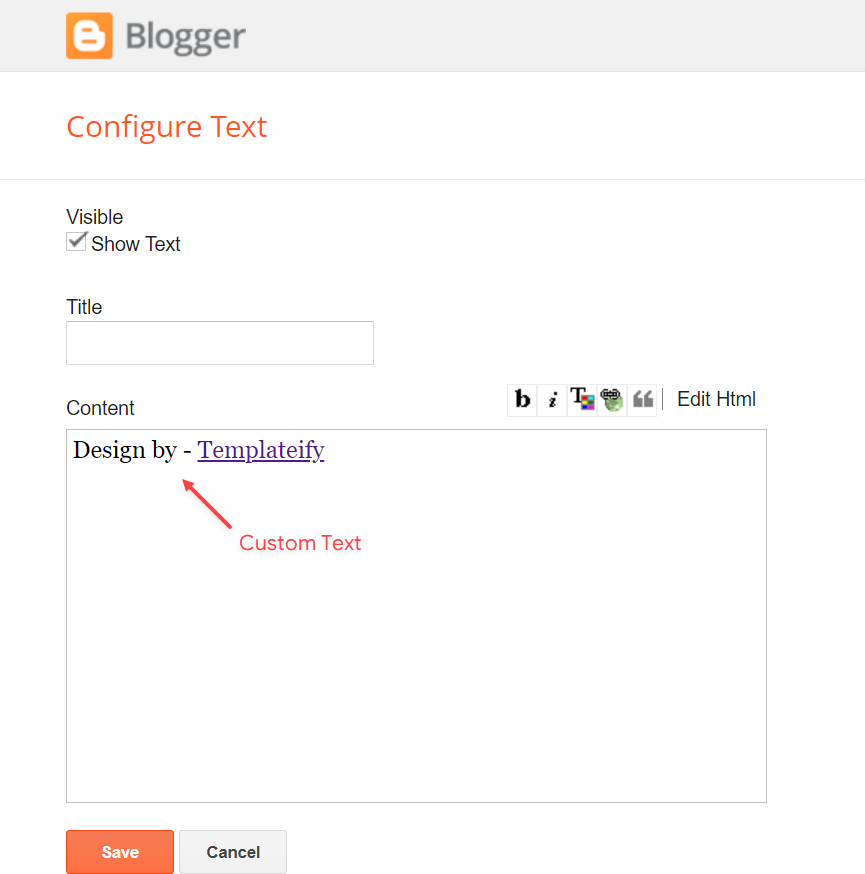
Footer Copyright (Premium)
Access your blog Layout > and click on the Edit Icon > in the Footer Copyright gadget.
For normal credits add ‘normal’ into the space for custom credits add your credits as shown below.
Widget Settings:
Access your blog Layout > and click on the Edit Icon > in the Footer Menu gadget.
Widget Settings:
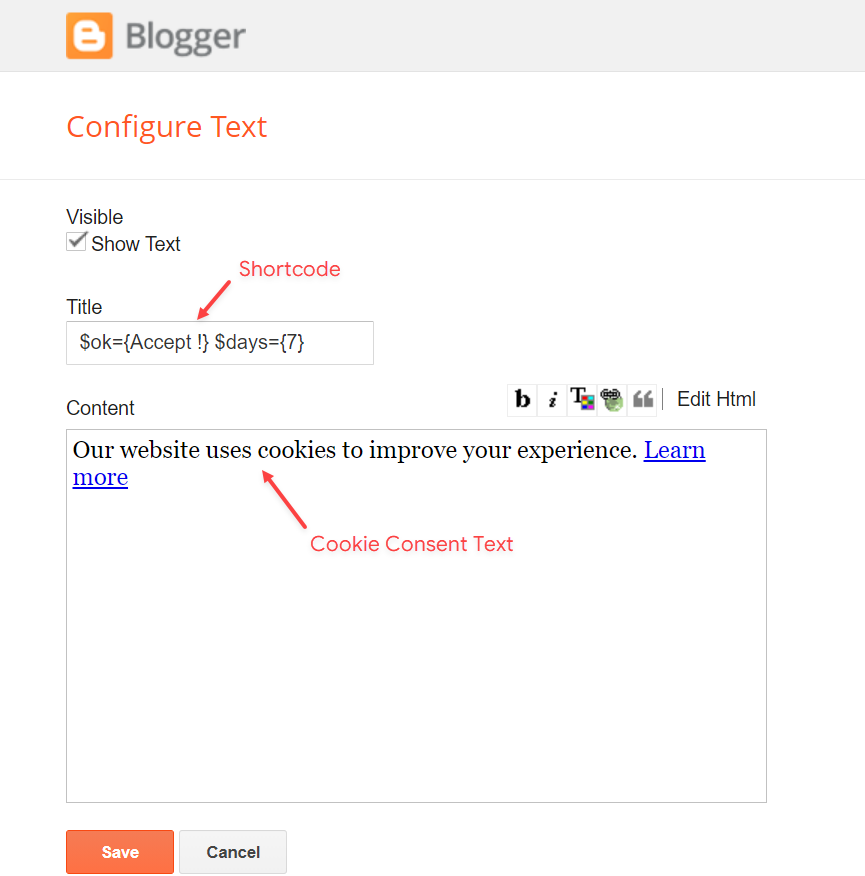
Cookie Consent
Access your blog Layout > and click on the Edit Icon > in the Cookie Consent gadget.
Shortcode: $ok={Button Text} $days={Expires Days}
Shortcode Example: $ok={Accept !} $days={7}
Widget Settings:
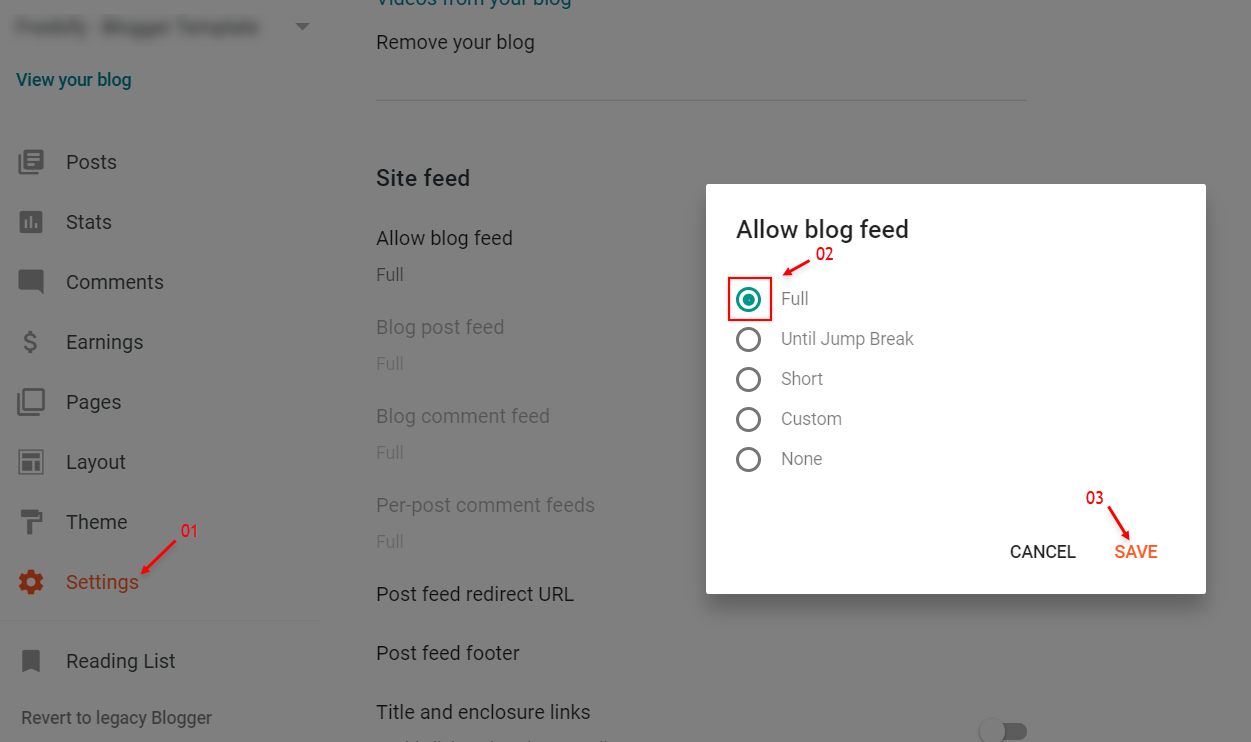
Site Feed
Access your blog Settings > and go to Site Feed.
Site Feed Settings:
Theme Options
1.1 – Facebook SDK
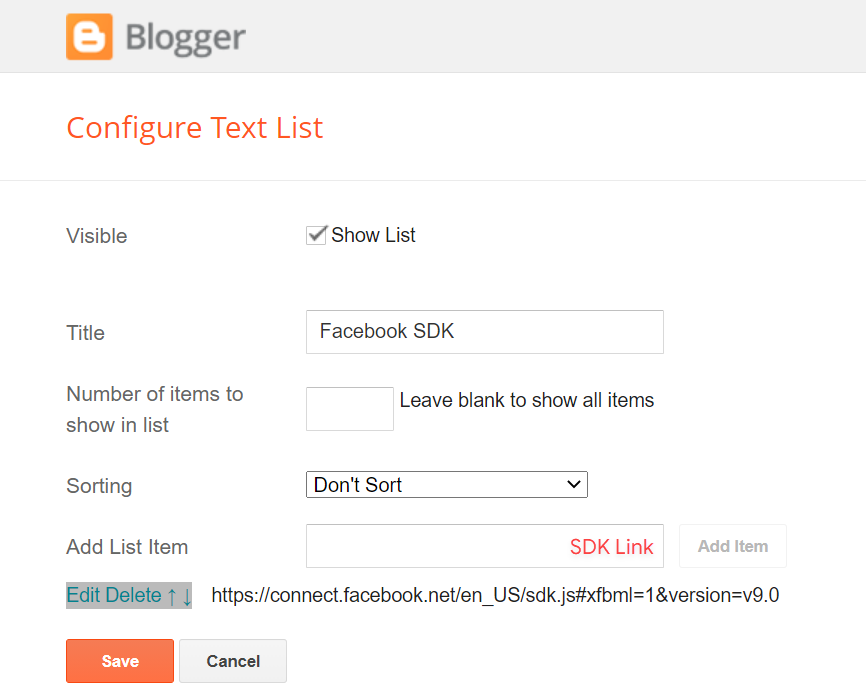
The Facebook Comments only work if you have the Facebook SDK installed on your theme. See below for the steps to acquire and install the Facebook SDK.
Get SDK:
Step 01: Go to https://developers.facebook.com/docs/plugins/page-plugin/ and click on Get Code button and copy the SDK Script.
Copying SDK:
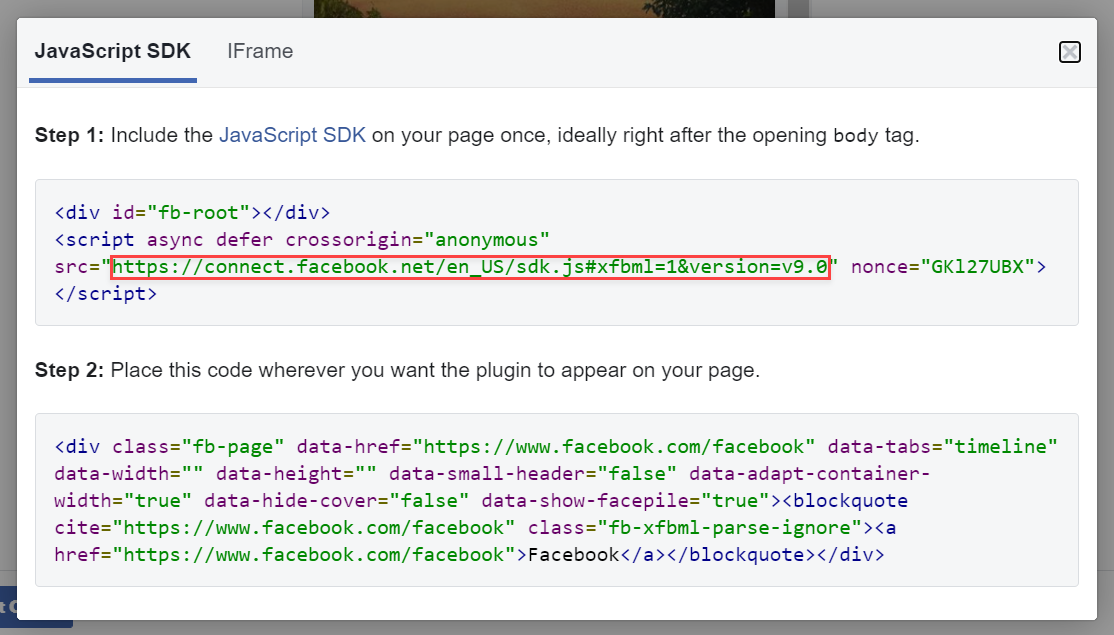
SDK en_US:
https://connect.facebook.net/en_US/sdk.js#xfbml=1&version=v9.0
Installing SDK:
Access your blog Layout > and click on the Edit Icon > in the Theme Options > Facebook SDK gadget.
Widget Settings:
1.2 – No Thumbnail Image
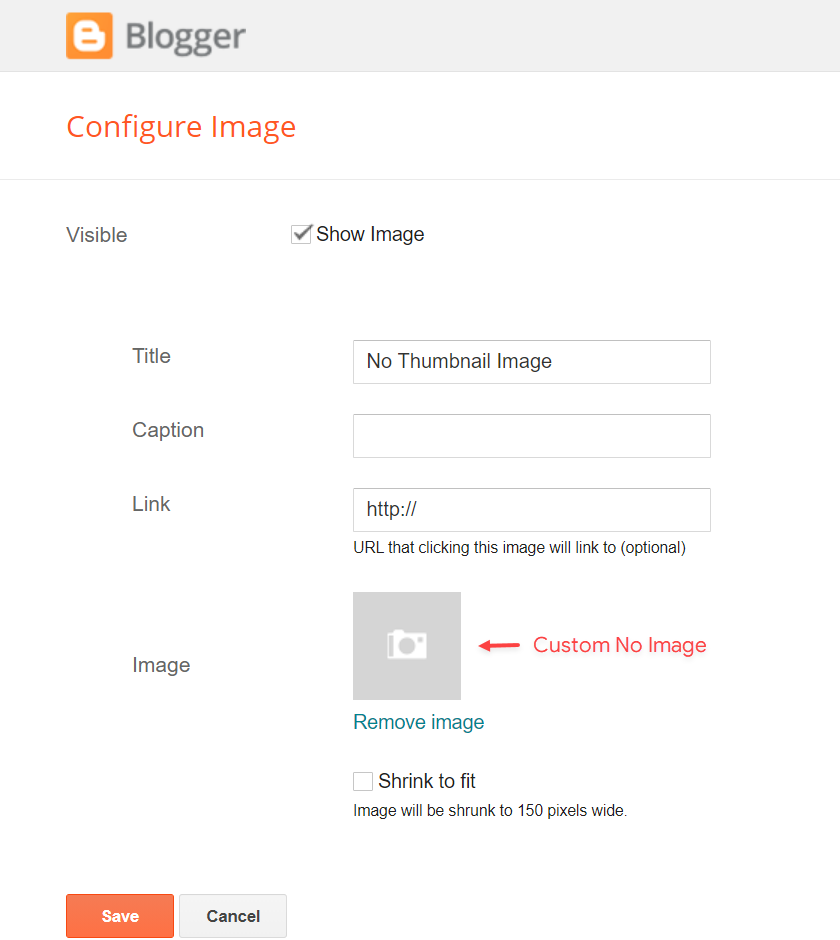
Access your blog Layout > and click on the Edit Icon > in the Theme Options > No Thumbnail Image gadget.
Widget Settings:
1.3 – JSON Variables
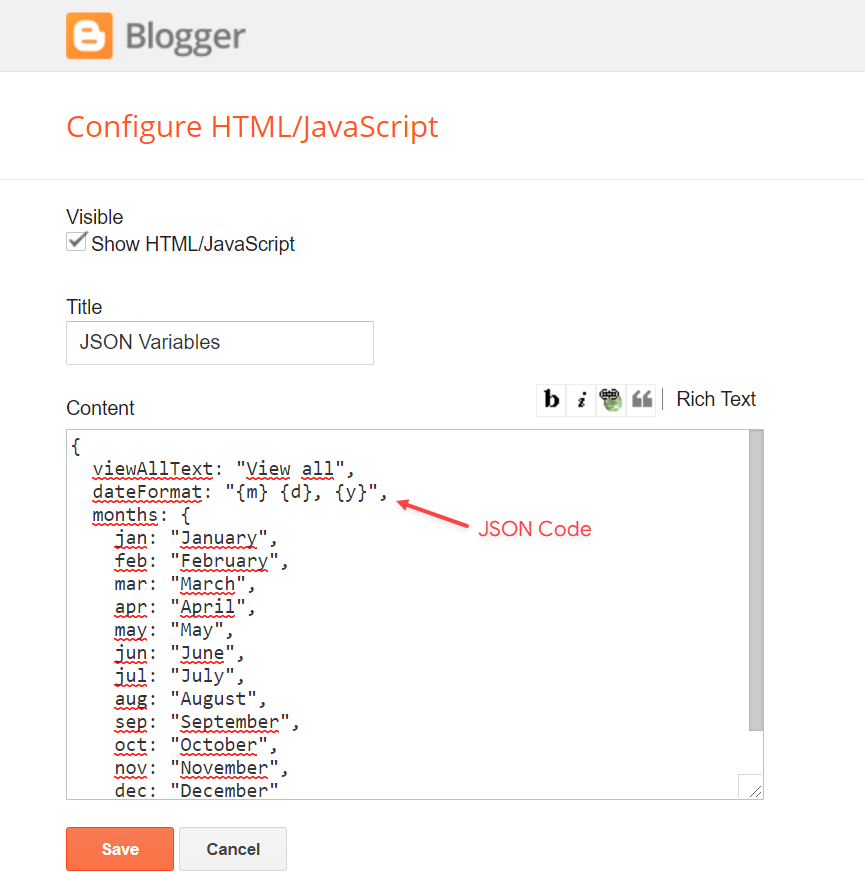
Access your blog Layout > and click on the Edit Icon > in the Theme Options > JSON Variables gadget.
{
  viewAllText: "View all",
  dateFormat: "{m} {d}, {y}",
  months: {
    jan: "January",
    feb: "February",
    mar: "March",
    apr: "April",
    may: "May",
    jun: "June",
    jul: "July",
    aug: "August",
    sep: "September",
    oct: "October",
    nov: "November",
    dec: "December"
  }
}
viewAllText: default is View all
dateFormat: default is {m} {d}, {y}
months: default is January, February, March, April, May, June, July, August, September, October, November, December
Widget Settings:
